3rd/50 Shooters Over All, 1st/4 Open
Rifle: Sig 556R with Aimpoint M4
Pistol: OST-TSD Glock 17 with RMR07
Given the present ammo shortage, I’m glad I have a lot of 7.62x39mm and that it is still relatively available compared to .223/5.56mm. The Sig 556R is only a noticeable disadvantage over an AR15 when it comes to standing reloads; if I can reload on the move, there’s no time lost.
Posted inRed Dot Glock, Sig 556R|Comments Off on 2 Gun Action Challenge Match 2-16-2013
I worked for Cavalry Arms Corp from 2001 until it ceased operations in June of 2010, beginning as shop help and ending as Vice President of the company. During that time I was able to participate in all aspects of manufacturing, product testing, warranty and repairs, and product improvement. It is funny now to think about this all in a historical context, because at the time we were just running a business. My goal in writing this is to provide the firearms community with the historical context of the CAV-15 receiver and it’s various revisions over that time frame. Working on the CAV-15 receiver was a learning experience for everyone involved; from where it began to where it ended up as a durable, reliable product was a long journey. In an ideal world the CAV-15 MKII would have been what the first CAV-15s were released as. Revisions and enhancements were incorporated constantly as issues were identified and resolved. The CAV-15 MKII has remained largely unchanged since it was released in late 2003.
Origin
The history of Cavalry Arms and the CAV-15 begins with Shawn Nealon. Nealon’s parents owned an injection molding and mold manufacturing company. Nealon would learn about injection molding, machine work, and manufacturing working for his parents. Nealon grew up with an interest in firearms including hunting, target shooting, and serving as a rifle instructor at Boy Scouts summer camps. Not long after High School, Nealon enlisted in the US Army and served in the first Gulf War in the 1/7 CAV as a Cavalry Scout. As a Cavalry Scout Nealon learned to appreciate the benefits of lightweight equipment and minimizing the weight one carried in the field. After the Gulf War, Nealon remained active duty for a period of time, and later in the Arizona National Guard. Nealon spent some time as a unit armorer. In civilian life, Nealon spent some time working for Accumatch, a company that manufactured firearms accessories, then as a partner in Advanced Tactical Firearms (which was later bought by Armscor). After the sale of Advanced Tactical Firearms, Nealon founded Cavalry Arms (named after his branch of service) and began working on what would become the CAV-15 receiver.
Nealon with CAV-15 MKI and MKII and prints circa 2003.
CAV-15 “MKI”
The CAV-15 injection molded AR15 receiver was first unveiled by Cavalry Arms at the 2000 Soldier of Fortune Convention in Las Vegas, Nevada. The first CAV-15 receivers shipped to consumers in December of 2000.
All CAV-15 receivers were injection molded in two halves from glass filled nylon 6, but the design went through 4 generations of revisions as assembly techniques were perfected and issues with the product addressed.
CAV-15 “MKI” Generation 1: The plastic of these receivers was untextured, and the halves were assembled together using screws only. Very few of these receivers remain in existence, most were remanufactured as later versions.
CAV-15 “MKI” Generation 2: The plastic of these receivers was untextured, and the halves were assembled together using a combination of screws and sonic welding. Very few of these receivers remain in existence, most were remanufactured as later versions.
CAV-15 “MKI” Generation 3: The plastic of these receivers was untextured, and the halves were assembled together using screws and more sonic welding. Internal structural enhancements were incorporated as well.
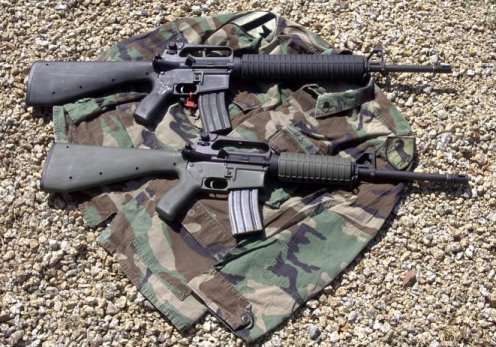
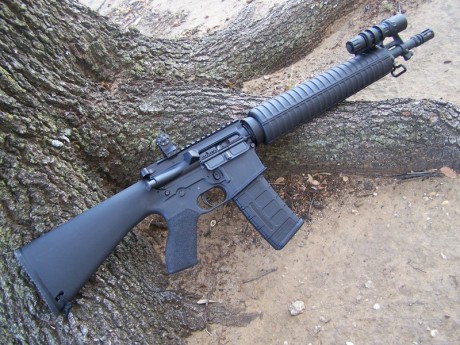
Note the longer reinforced area at the back of the stock. This was added to reinforce the buffer tube that used a rifle length buffer. The rifle buffers were cracking the back end of the buffer tube.
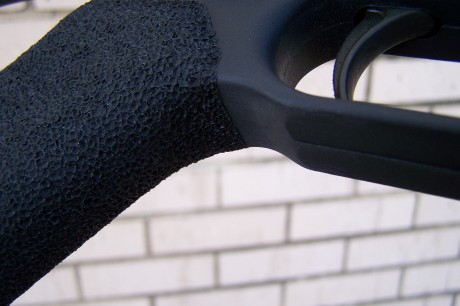
CAV-15 “MKI” Generation 4: Same as the Gen3, except texturing was added to the plastic.
Other Notes
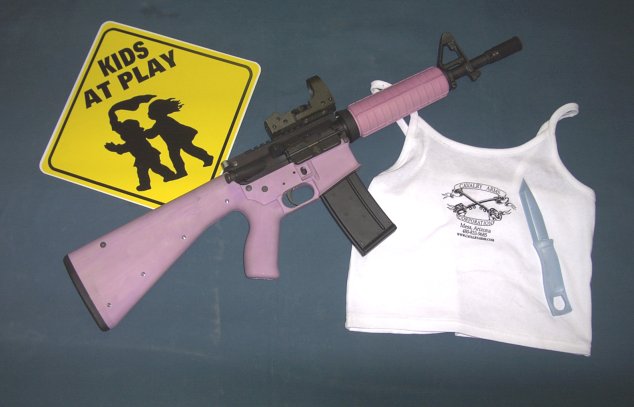
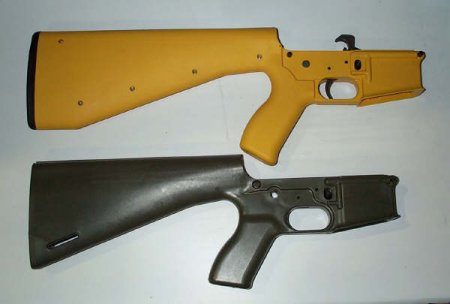
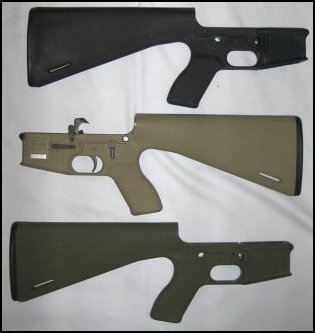
Colors: Cavalry Arms made receivers in a wide varieties of colors including Black, OD Green, Desert Tan, Purple, Yellow, Blue, and Pink. Cavalry Arms got into manufacturing AR15 furniture out of necessity to have matching handguards for its lower receivers. Later the OEM side of manufacturing handguards, buttstocks, and pistol grips for most of the industry would make up the bulk of Cavalry Arms’ sales compared to the CAV-15.
Speed Pins: To reduce scrap rate and increase product durability, Cavalry Arms switched from standard military style take down pins to “Speed Pins” that have the spring and detent built into them. The hole for the standard rear spring/detent was found to be a fail point that could crack all the way into the pistol grip. The front spring/detent area was prone to chipping. Speed Pins are still standard mil-spec diameter. Some Gen3 and roughly half of the Gen4 receivers in existence use these pins. All CAV-15 MKIIs use speed pins.
Shortened Receivers: The CAV-15 “MKI” had a 14.5″ length of pull, making it longer than an A2 stock. To meet the demand for requests for shorter stocks, Cavalry Arms offered stock shortenings for their receivers making them roughly A1 length. The process involved chopping off the end of the stock, running a delrin plug into the buffer tube that the buttplate would screw into. Screws were run into the sides of the stock into the plug for structural support. This process also made the receiver use a carbine buffer system. The popularity of this modification resulted in the A1 length of pull on the CAV-15 MKII.
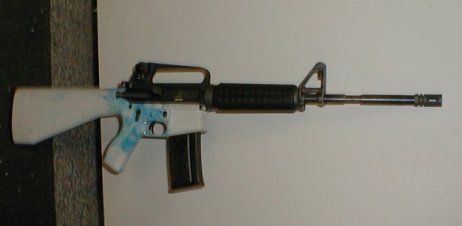
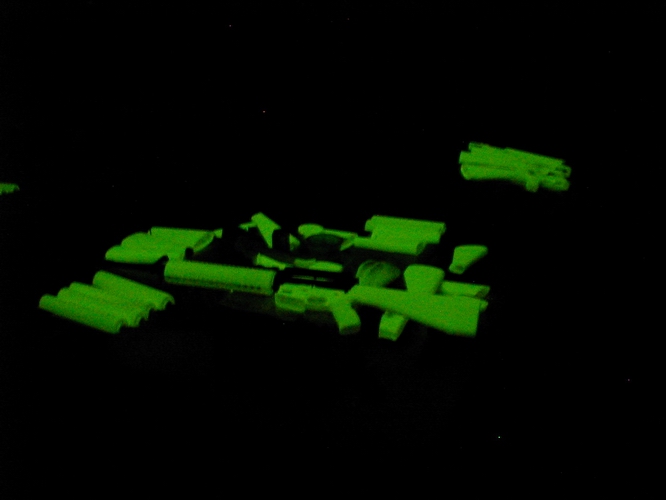
Seven Glow in the dark receivers were made and given to company investors and staff in 2002.
CAV-15 “MKI” receivers were discontinued in February of 2003 with the announcement of the upcoming CAV-15MKII at SHOT Show. Existing inventory of CAV-15 MKI receivers was sold off to wholesalers. The CAV-15 MKII replaced the CAV-15 “MKI” in the Cavalry Arms Product line.
CAV-15 MKII
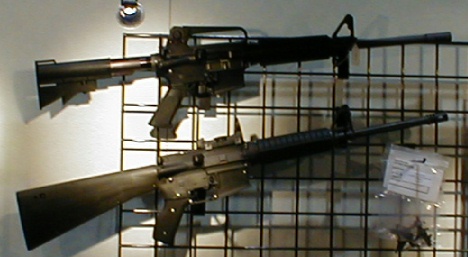
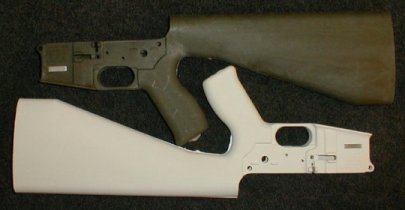
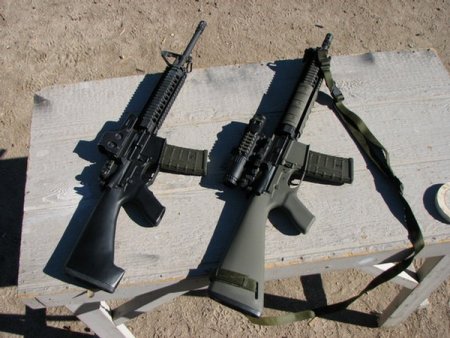
CAV-15 “MKI” receiver (top), with its successor the CAV-15 MKII (bottom)
CAV-15 MKII receivers were released in November of 2003, replacing the CAV-15 in Cavalry Arms Corp’s product line. The original CAV-15s were called “MKI” retroactively to establish their difference from the CAV-15 MKII. Cavalry Arms Corp. sold CAV-15 MKIIs until it gave up its FFL in March of 2010
The delay between discontinuing the CAV-15 MKI and release of the CAV-15 MKII was caused by the fact the CAV-15 MKII was originally to use the same sonic welding process as the MKI. It did not work and the parts wouldn’t stay together. The decision was made to switch to Linear Vibration Welding, and the mold was modified to accommodate for this different process. Ultimately, the delay was worth it as Linear Vibration Welding was faster and more consistent, producing a stronger weld. The machine required for this process was significantly more expensive however.
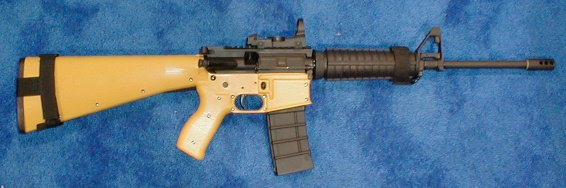
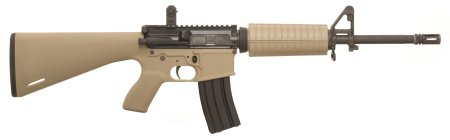
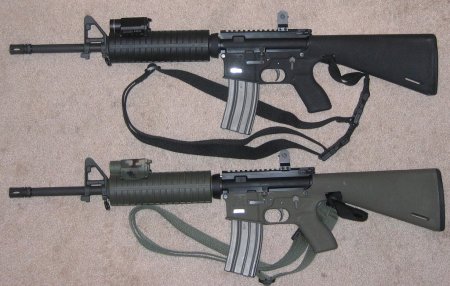
CAV-15 MKIIs are the most prolific CAV-15 receiver with thousands having been produced. Standard colors included Black, OD Green, Coyote Brown, Foliage Green, and Dark Earth. Special production runs in Pink, Light Blue, Dark Blue, Blaze Orange, Electric Green, Pigeon Gray, Urban Gray, Yellow, and others. Some colors are much more rare than others. 11 Glow in the Dark MKIIs were also made.
The CAV-15 MKII was also produced under marking variances for Sabre Defence as the SR-15 “Light Sabre” and for Eagle Arms as the M15P. Both of these were only available in black.
CAV-15 MKII Receivers were injection molded from glass filled nylon 6, a polymer material very similar to that used by other firearms companies. Polymer offers unsurpassed corrosion resistance, finish durability. and is significantly lighter than aluminum based receivers.
The receivers were molded in two halves and assembled using a linear vibration welding process. Linear vibration welding formed the two halves into one solid piece. Every contact surface between the two halves was bonded together with a weld that was even stronger than the parent material.
CAV-15 MKII Receiver Features:
• A1 Length integral Stock (5/8″ shorter than A2) with sling loop. 13″ Length of Pull.
• Carbine buffer system (reinforcement ribbing behind the buffer tube area to absorb impact)
• Ergonomically enhanced integral pistol grip
• Wider magazine well capable of accepting .45 Greasegun magazines with caliber conversion upper receivers and magazine blocks. Standard AR15 magazines can be used without modifications.
• Receiver weight (complete) is 1 full pound lighter than complete aluminum receiver with A2 stock
• Uses all standard mil-spec parts with the exception of the take down pins. The front pivot and rear pins are a Quick Take down style with Detents built into them, This allows for quick and easy removal of the pins while maintaining a positive lock.
Other Notes:
Serial Number Tags: Sometime in 2008 Cavalry Arms changed the serial number tag to comply with new BATF guidance to make them more tamper proof. Many polymer firearms manufacturers made similar changes around the same time; look at older Glocks vs newer Glocks for example.
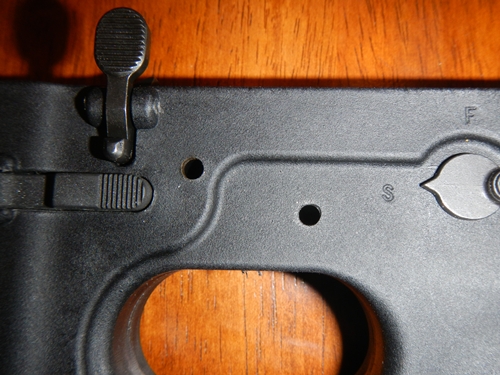
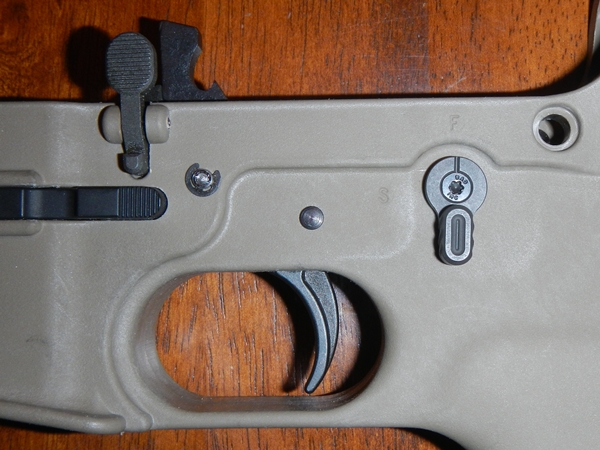
Safety Selector Spring and Detent Hole: The hole for the safety selector spring and detent is drilled from the top down into the pistol grip on the CAV-15 receiver. Later MKII receivers had the upper half of this hole formed in the mold to make production easier. The preformed U shaped hole in this area served to help center the mill or drill press for drilling the hole down into the grip. It also prolonged drill life and prevented the drill from walking as it went down.
Single Point Sling Slot: Cavalry Arms offered a factory service to slot the receiver to accept a single point sling
CAV-15 MKII Shortened Receiver by Echo 93
Joe Elledge of Echo 93 was authorized by Cavalry Arms to perform modifications to the CAV-15 receiver including shortening the stock and modifying the pistol grip
CAV-15 MKIII Prototype
Cavalry Arms Corp. exhibited a prototype CAV-15 MKIII at the 2008 SHOT Show. This prototype showcased several new features:
• 9.5″ Length of Pull Stock, that could be extended with spacer plates.
• Club foot stock for supported shooting
• Redesigned pistol grip allowing for a higher hold
• Texture and finish enhancements
Unfortunately Cavalry Arms Corp. was never able to bring this receiver to market. Only one prototype existed and it was destroyed.
I purchased the CAV-15 and CAV-15 MKII Mold/Tooling when Cavalry Arms was closing operations in mid-2010. I was intending to manufacture them under my own company. After six months of interviews and meetings with BATF, and no definite answer on getting an 07 FFL manufacturing license, I elected to drop my application and sell the CAV-15 MKII Mold/Tooling. GWACS Armory of Tulsa, OK eventually purchased it in December 2011, and began manufacturing operations in 2012. GWACS is currently offering service and support for existing CAV-15 type receivers if you already own one.
Update March 2019
In the few years the CAV-15 MKII had been off the market, other lesser polymer designs that did not use an integrated buffer tube and stock became prevalent. These designs developed a bad reputation for breaking. Once GWACS resumed production of the CAV-15 MKII reintroducing it was made difficult by general public ill-will against polymer receivers in general.
I worked with GWACS helping them with sales and general consulting/product knowledge. To address some of the durability concerns, in 2014 I made this video with my friend Karl Kasarda, who would later go on to start InRange TV with Forgotten Weapons’ Ian McCollum:
Sales continued at a moderate pace for GWACS until in 2017 InRange TV announced their What Would Stoner Do Project
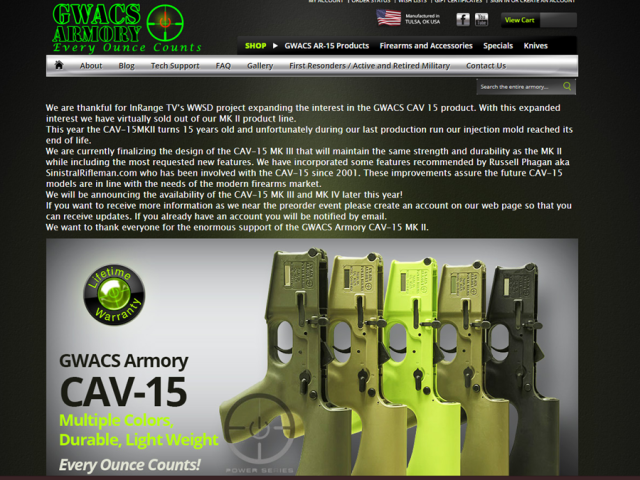
GWACS Sold out of CAV-15 MKII Receivers by the summer of 2018 thanks to the interest generated by InRange. Unfortunately, the CAV-15 MKII was worn out at this point. GWACS announced that they intended to develop and release 2 new models and posted this message mid 2018:
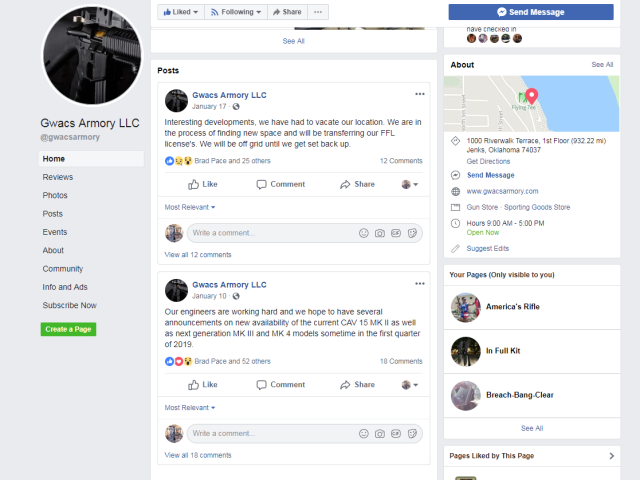
In January of 2019 these messages were posted to the GWACS Facebook page:
I have not had any direct contact with GWACS for some time now. My Point of Contact no longer works for that company, and the president never responded when I reached out.
What is the future of the CAV-15 Receiver? As long as I’m alive the concept of a CAV-15 style receiver is not dead. Be patient and stay tuned…
Posted inCAV-15, Gear|Comments Off on History of the CAV-15 Polymer Receiver
The CAV-15 MKII receiver, while being very similar to an AR15 receiver has some differences that allow some match triggers to work, and others to not work well at all.
What Won’t Work
Rock River Arms 2 Stage Triggers. Over the years I have tried 4 different RRA 2 stage triggers in CAV-15 MKIIs with varying results.
One didn’t work at all, one immediately started doubling, one worked for about 500 rounds then wouldn’t reset anymore, and the last worked for a few hundred rounds then starting doubling.
Timney Triggers
The Timney trigger tensions against the bottom of the lower. This works in a normal aluminum receiver. In the CAV-15 MKII it just makes the lower flex, and the trigger will not reset correctly.
What Works
ALG Combat Trigger
The ALG is a good option for people wanting Mil-Spec style trigger, but cleaned up to be as crisp as possible and the minimum mil-spec weight. This unit installs just like a GI trigger and requires no modification to the CAV-15 MKII lower
Spike’s Battle Trigger This is a mil-spec trigger with nickel boron coating. It features standard installation, and a trigger pull of 5-9 pounds depending on individual spring variances. No modifications are necessary for installation in the CAV-15 MKII.
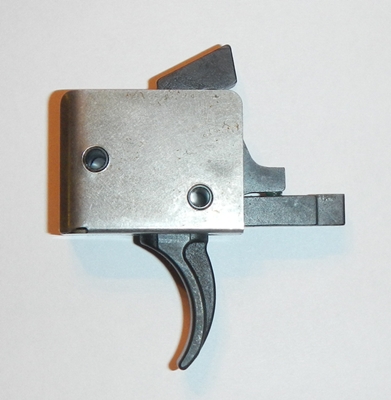
Modular cassette type triggers like the McCormick AKA CMC.
I feel these are of particular benefit in the CAV-15 MKII because they are not effected by the flex of the plastic. While USGI style triggers have no issues in the CAV-15 MKII due to their generous engagement surfaces; match triggers that function in the normal manner may not have enough engagement surface to accommodate for the flex the plastic may experience through function. Modular triggers are self contained and immune to this issue.
Modular triggers also do not require any adjustment to the trigger on the part of the user. Triggers that require set screw adjustments to work are best installed by gunsmiths, and sometimes require readjusting. I also recommend the CMC for use in aluminum receivers for this reason; I have over 40,000 rounds between my several CMC triggers and they’re still working without issues. The Wilson Combat trigger is a similar modular cassette type unit and will likely work the same way.
Modifications are required for use in the CAV-15 MKII.
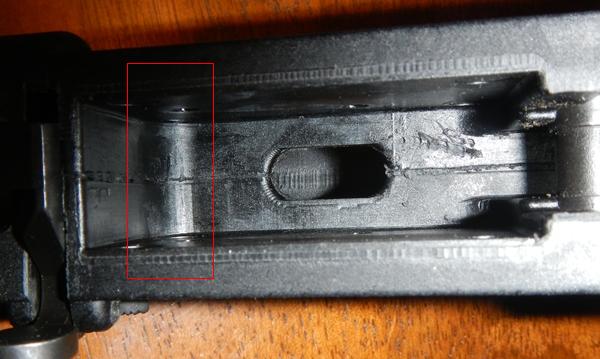
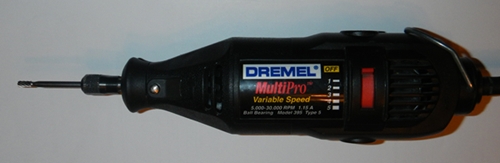
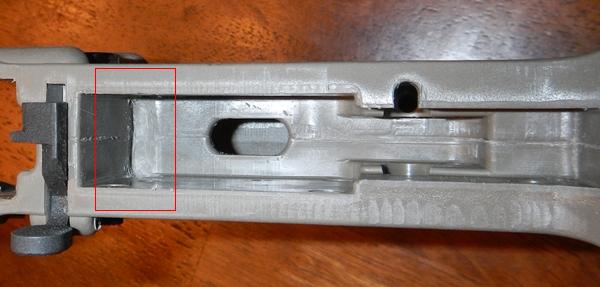
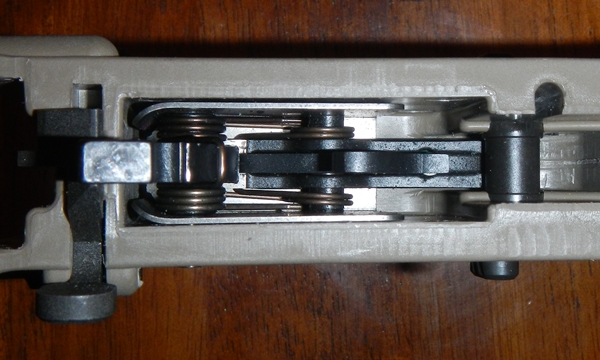
The front of the fire control area of the CAV-15 MKII has a radius that will prevent the modular unit from sitting all the way in. This is easily remedied with a dremel tool in a few minutes.
Use a small cutting bit with a flat top to remove the radius inside the lower. Do not cut too far forward, or cut deeper into the fire control area. Remove material slowly and check fit frequently.
The required material removal is finished in this picture.
The hammer pin area on the CAV-15 MKII receiver is wider than an Aluminum receiver. Standard USGI triggers and the ALG use a J-pin in the hammer to hold the hammer pin in place and thus a longer pin is not needed with those triggers. Modular triggers do not use a J-Pin to capture a standard fire control pin like USGI triggers or the ALG; they generally use pins with small screws or C-clips to be held in place.
There are several Options for the modular trigger user with the CAV-15 MKII to deal with this issue
1) UPDATE: These pins are no longer available. Cavalry Manufacturing Big Pin for the CAV-15 MKII receiver. This pin is sized to correctly fit through the CAV-15 MKII receiver for use with modular triggers and is retained with E-Clips. These have been out of production for a few years, but Cavalry Manufacturing will be resuming producing them now that GWACS Armory is producing CAV-15 MKII receivers again.
2) Use a long machine screw and nut through the hammer pin area. While it won’t look pretty it will work.
3) Have a machinist mill down the outside areas of the receiver to be flush like an AR15 lower. I saw a few examples of this working at Cavalry Arms, but there was no long term testing conducted with regards to structural integrity issues. This will also probably void your warranty
4) The modular trigger may fit tightly enough that the longer hammer pin is not required at all and the trigger pin alone is sufficient to hold it in place. If you choose this method, test it thoroughly for reliability.
Top to Bottom: JP Trigger Pin, CMC Trigger Pin, Cavalry Manufacturing Big Pin.
CMC Trigger installed with Cavalry Manufacturing Big Pin
Posted inCAV-15, Gear|Comments Off on Match Triggers in the CAV-15 MKII Receiver
Cavalry Manufacturing has been working on a new lower for the SCAR MK17S for some time now. I was recently given a prototype to test with my MK17S.
The upper on the SCAR is the regulated serial numbered part, so the lower is basically a trigger pack/magwell module. The Cavalry Manufacturing unit is machined from aluminum billet and accepts the parts out of your existing SCAR MK17S lower.
I will be testing a production unit in the future.
I got a Sig 556R in 7.62x39mm and used it at the last two matches of the month. I really like it so far, I will be posting a more in depth review after I use it more:
Phoenix Rod and Gun 3-Gun
3/4 Open (not a big turn out right before Christmas)
Rio Salado Last Blast Rifle Match:
27/92 Shooters
This match was very beginner friendly as it was all close range and not very physically challenging. While I generally prefer more difficult events, it was fun. Matches like this definitely have their place in encouraging less experienced shooters to participate.
My girlfriend, Stephanie, competed as well and finished for the first time with no penalties. Here’s her video:
Posted inCompetitions|Comments Off on December 2012 Matches
In the past week we have been contacted by many of you for advice when looking to make your first firearms purchase due to security concerns, or looking to add more to the collection based on the potential for legislation. We appreciate that you trust our knowledge and experience when it comes to the technical aspects of firearms. If you have made purchases, we welcome you to the fold as gun owners. As Jeff Cooper once said, “Owning a handgun doesn’t make you armed any more than owning a guitar makes you a musician.” You have started on the path to being self reliant, it is now time to continue on that path with training.
From basic safety, basic operation of the firearms, maintenance and cleaning, to advanced shooting techniques and improving your skills, we can train you to become more proficient in the use of your firearms. We prefer small class sizes of 4-6 students. Individuals, couples, or families, are all welcome. We can present a class specific to the firearms you own and make you and your loved ones comfortable and capable of handling them safely and effectively.
With rights come responsibilities, and as a gun owner it is your duty to seek out training and improve your skills. If not from us, please consider taking training from any reputable training school.
Please contact me privately at SinistralRifleman@hotmail.com to discuss your firearms training needs
AGP Arms of Tempe, Arizona is a spin off from custom car parts maker AGP Turbo. AGP’s Owner/President Kevin T. answers my questions about getting into the gun business and his products below. My questions are in bold, his answers are in italics:
After years of making custom car parts with your business AGP Turbo, what made you want to transition into the firearms industry with AGP Arms?
The parts we make are simply things we personally wanted but nobody was building (at least to our standards). We honestly consider AGP Arms a completely out of control hobby more than a business. We have some amazing manufacturing abilities and very high standards, so the sky’s the limit on what we will do. It can be pretty risky when you are $100,000+ into a project just because you thought it was a cool idea. You are certainly crossing your fingers that customers like it as much as you do.
How much of the manufacturing technology you use for AGP Turbo was applicable to AGP Arms?
We used all of our resources to get going in the firearms industry and had to add a couple. My background prior to the turbo business was in aerospace manufacturing, and neither of those fields utilizes injection molding. So getting up to speed with the molding industry was a pretty interesting and frustrating learning experience.
From a technical standpoint, what is harder to design and produce, car or gun parts?
Designing the car parts is certainly more of a task and requires more engineering. But producing any of the individual parts, is pretty similar. The size of each project is quite different, our new twin turbo kit for the 2010+ Camaros was mammoth compared to any of the gun projects.
What were the first products AGP Arms offered for the firearms market?
Our first big deal was the 10rd. mag for the Saiga-12. We were the first aftermarket company to make a mag for the S-12. Back in those years you could get a S-12 with one 5rd. mag included. You pretty much couldn’t even find another 5rd. factory mag unless you bought another gun. I thought the S-12 was really something special but held back by the lack of magazines. So we started that project shortly after the AW ban expired and were extremely concerned that we could get the S-12 declared a DD and banned from importation. It was a crazy time back then, we were tip toeing around many potential issues. That first molding project took 10 times longer than it should and we had to start completely over, right when we thought we were done. We became serious experts at feeding flat faced, rimmed shells of various lengths from a magazine. Not many people have pulled that off reliably.
Your side folding stock is compatible with a variety of platforms including AR15s (with specific uppers), Sig Rifles, AK variants, and Saiga-12s. In addition to its adapability, what were your goals in designing it to produce a better product than others on the market?
We wanted something lighter weight and with a push button latch. The storage space inside was designed around our SBR barrel for the our 10/22 takedown. A few years ago we were working on our own US made S-12 type shotgun and the folding stock was going to be integral in that too. That project fizzled as profitability on the S-12 mags has gone away.
What made you want to make a 10/22 take down kit?
The smaller you can make a gun, the more likely you’ll have it with you. Just like a CCW pistol, a .380 in your pocket beats a double stack .45 in your safe. A take down .22 is easily carried on any outing, or stashed away somewhere useful. I use to be a big Marlin Papoose fan for this purpose. But in my nature, I always pick my things apart for how they could be better(guns, gear, cars, motorcycles, ATV’s). Nothing I own is ever good enough to avoid this scrutiny. The Marlin was the best off the shelf rifle for my needs but short comings left me wanting more. Main problem is still really big even taken apart. Too long to fit in a normal sized backpack, poor trigger design, lower capacity mags, no aftermarket support. So rather than beat my head against the wall fixing all the things I didn’t like about the Marlin, it was less work to just make the superior 10/22 a take down.Smaller, Lighter, Faster, Stronger. Those four words were the hub of the design intent on the take down project but really applicable to any great firearm.
Now that Ruger has come out with their own 10/22 take down rifle, what makes the AGP kit better than the Ruger factory rifle?
Ruger’s factory take down has been great for our sales as it got people thinking they wanted a take down 10/22. My guess is once they start looking into it further they come across ours and prefer it. Ours having the folding stock, shorter threaded match grade barrel, handguard options, superior return to zero, storage compartment in stock. A customer can use our folding stock on the Ruger factory take down with a little modification.
(AGP has started offering a specific kit for the Ruger factory 10/22 take down rifle since this interview)
We understand some fitting may be required on the 10/22 reciever for the quck take down adapter to be installed. Is this something the end user should be concerned about, how easy is it to do?
It’s very minor but when installing our barrel adaptor into the receiver you should look out for things that will keep it from seating all the way down. A build up of paint in the inside corner or burrs at the very front edge where the factory v-block goes over.
You’re offering an enhanced extractor for the 10/22, how is it superior to the factory extractor?
We EDM a hardened tool steel extractor for the 10/22 and use a dual spring to tension it. We build these into all of our complete rifles. This keeps the gun running longer as it gets more dirty. While we’re on the subject of reliability, it’s pretty simple.1. Junk mags- use factory mags, those BX-25 need cleaned and lubed.2. Ammo- CCI mini mags run cleaner3. Oil the gun- especially on the guide rod4. Clean the gun
How is the barrel you are offering superior to a factory barrel?
Our barrels are drilled straighter, match grade blanks to begin with. Machined with a Bentz dimension chamber and trued up to make OD perfectly concentric to the bore. All our barrels are threaded 1/2-28 concentric to be bore with a machined in flange so your suppressor seats up perfectly square. The factory barrel retention system is a ‘V’ shaped block that hooks on the bottom of the barrel and the more you tighten down the v-block, the more the barrel droops. Our retention system squares the barrel up as you tighten it, by design pressing evenly all the way around the barrel’s flange.
While other manufacturers might make all their own accessories for a handguard system themselves your tubular handguard is compatible with Magpul’s MOE accessories. How do you feel this kind of compatibility improves the function and consumer appeal of your products?
Magpul makes good stuff and I like parts interchangeability in my gear. In this case we are able to use Magpul’s MOE rail segment by just making our own locking plate for it to screw into. We only want to reinvent the wheel when we have to.
What’s next for AGP Arms?
More 10/22 parts and options.
Posted inGear, Industry Insiders|Comments Off on AGP Arms Ruger 10/22 Take Down Kit Review/Test
The Pecos Run-N-Gun is a shooting and foot race biathlon held in the West Texas desert. It has never really been advertised and if you Google it most of what you will find are old forum posts of people talking about it. The important thing to know about this competition is it is one of the few that equally tests both the competitor’s skill with firearms and their physical conditioning.
Don Langworthy recently won first place at the 2012 Pecos Run-N-Gun competition. I have known Don since 2002. Don is a competitive shooter, but he is also an athlete; a rare combination in the competitive shooting world. Most people in competitive shooting world neglect the physical aspects of the sport; or do just enough physical training to be effective in shooting competitions. Don has a passion for fitness and shooting, and those things are what drew him to the Pecos Run-N-Gun. Don recently placed first this year after a 2ndplace finish in 2011. Don currently works as Gun Manager of Shooter’s World, where he applies his knowledge and experience with firearms to better serve his customers.
I spoke with Don to get his thoughts on the match and what went into his win this year. My questions are in bold,Don’s responses are in italics
How many times have you done the Pecos Run-N-Gun?
2012 was my third time. I placed 5th in 2009 and 2nd in 2011.
How has it changed from year to year?
In 2009 and previous years the run was held in August, which was substantially hotter than the October dates for 2011 & 2012. Also, the course changed in 2011 to a slightly different location, but the the overall distance seemed to remain the same. 2011 and 2012 were virtually identical in all aspects except how the running order was determined.
What have you changed in regards to your equipment from the first time to your win this year and why?
This match doesn’t require much equipment-wise, but each shooter has to determine the balance between carrying too much or not enough. I scaled my gear down to what I confidently felt was the minimum safe level, but I certainly could have taken a smaller pack or less ammo. Overall my kit for all 3 years has been very minimalist, although I still carried a basic AR field repair kit (with 3-piece rod) and emergency medical supplies.
What have you changed in regards to your fitness routine to optimize for the Pecos Run-N-Gun?
It might sound obvious, but if you want to win a race you need to start running. In the weeks leading up to the match I tried to do a 3-mile run twice a week, and a 5-mile run every other week, in addition to my normal workout routine.
What does your daily/weekly exercise routine consist of?
Earlier this year I completed the P90X program, and was about 2/3 of the way through it a 2nd time prior to the Pecos trip. It is a pretty rigorous total body workout that alternates cardio, upper & lower body, core strength and flexibility to produce great results. On top of doing P90X 6-7 days a week I did the above-mentioned runs and generally bike 20+ miles a week as well.
What are some other extreme competition events you have participated in?
Does shooting Trooper Class at the MGM Ironman 3gun count? I’ve done that quite a few times. Earlier this year I began participating in various “Mud Run” events such as Tough Mudder and Spartan Race, which I’m also signed up for in 2013 as well as various shorter events. Last weekend I did the “Dirty 6” Mud Run in Phoenix, which was 6.5 miles, where I placed around 50th out of 500+ runners (final results are still being tallied at this time).
How does the Pecos Run-N-Gun compare to Tough Mudder or Spartan Race with regards to physical difficulty?
Other than running, the Pecos Run-N-Gun doesn’t really force you to do anything else physical, although shooting long-range targets when winded is incredibly challenging. Spartan Race and Tough Mudder are 8-12+ miles, and in addition to getting you muddy and freezing cold pushes your entire body through series of obstacles and phsyical challenges. However, you can power through them with brute strength, whereas Pecos requires you to settle your mind and body and make hits from unorthodox shooting positions out to 400 yards.
How much water/fluids did you take with you?
I carried a full 3-liter Camelbak, which I consumed about 80% of. I drank a lot of water before starting too.
Did you use any energy or electrolyte replacement products, if so how much did they help?
I had a long wait at stage 4, so I ate a pack of Clif Shot Bloks which was refreshing (along with a 15 minute wait which gave me time to recover before shooting). 5 minutes before my run I took a Clif Shot Double Espresso Gel which gave me a bit of a push out of the starting gate too.
You own many types and configurations of rifles, what rifle and optic combo did you choose for the competition this year and why?
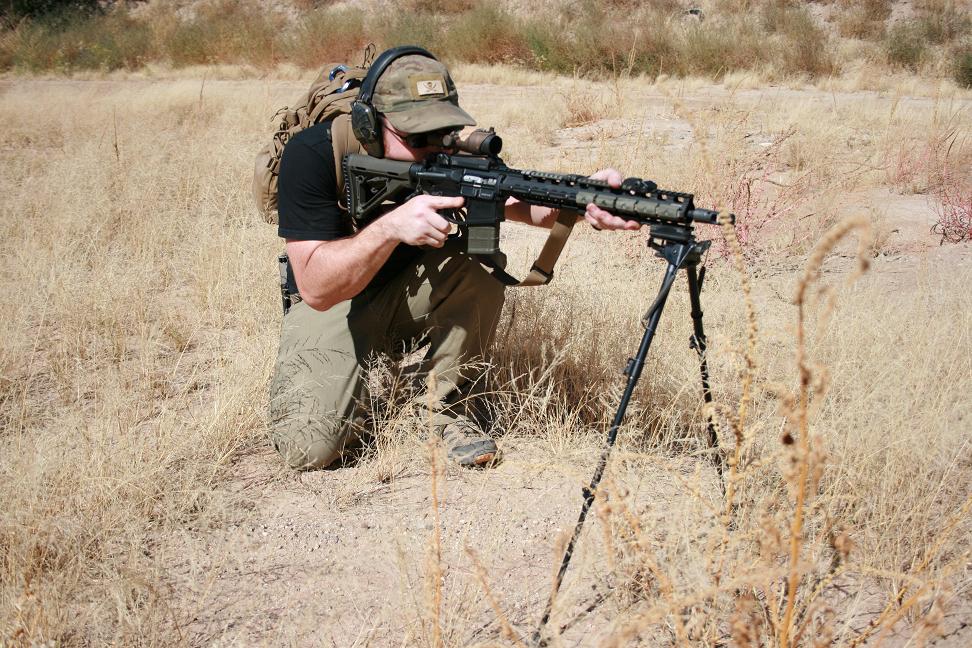
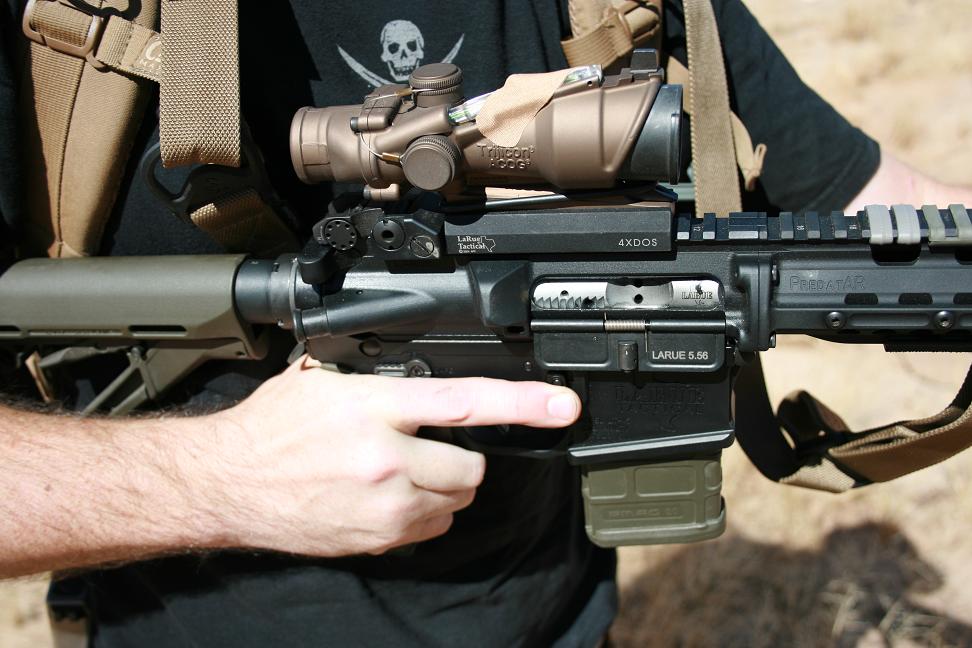
Earlier this year I got a hold of a Larue PredatAR in .223, which I’ve been using heavily for 3-gun competition. I felt it was the perfect gun for Pecos because it is sub-MOA accurate, but ridiculously lightweight (only 6.5lbs from the factory). It has a long 15″ freefloat handguard that is great for shooting off barricades like stages One and Two required, because you can rest solidly without contacting the barrel and getting deflection. I topped it off with a Trijicon ACOG TA31H-G which is a great compact 4x scope that was ideal for the 100-400 yard targets at this match.
What type of ammo did you use?
PMC Bronze 55gr FMJ. Although a heavier bullet may have helped fight the wind on longer shots, this is my default 3-gun load that my gun was zeroed for.
How do you think your experience in action shooting sports helped prepare you for the competition?
Knowing your hold for longer ranges, shooting from awkward positions, and shooting support side were all required for this match, and fortunately I practice those regularly at the local matches I participate in. Competing several times a month in events that push your speed, accuracy, and endurance on the clock prepares you for a match like the Run-N-Gun, where you might be exhaused and taking a 200+ yard offhand shot.
Tell us about the shooting courses, what distances were the targets at? Were they more accuracy or time based?
Most of the targets were between 100-200 yards, except stage 5 where we shot out to 400 yards. There were also close-range pistol targets on Stages 2 and 6. All stages had a 4-minute time limit, but most required less than 10 rounds and could realistically be finished in 30-60 seconds. I shot as fast as I could with reasonable accuracy, and was in the top 10% for 5 of the 6 stages.
What environmental factors did you need to consider when shooting the stages?
Most of the shooting positions at this match won’t allow you to go prone or even kneeling in many cases because of the brush and ground cover. Therefore the ability to make hits from an unsupported standing position is invaluable. Stage 5 had the longest targets, but had enough clearance to get fairly low to the ground and support your rifle; I shot from a kneeling position with an extended bipod. The wind was deceptive on that stage for me, because there was no breeze at my position, but a pretty decent crosswind at the 400 yard plate. I underestimated the wind (and was not heeding the RO’s advice), and wasted a lot of rounds before I scored my 2nd hit on that target.
What was the required round count vs the amount of ammo you expended?
I think the minimum round count would have been about 40 rounds. I always carry more than enough to be safe, and fortunately I did because I struggled with the 400 yard plate on stage 5 and expended almost 30 rounds before clearing the stage. Because of that I used about 70-80 rounds total for the match. There were approximately 15 pistol targets and I used about 25 of the 50 rounds I was carrying.
Did you use any accessories that made the courses easier?
At last minute I borrowed an extended Harris bipod (13-27″ I believe) with a QD Larue mount. I started with it mounted on the gun, but due to the weight ended up taking it off and on between stages and stuffing it into my pack. I thought it would help me out on some of the more rugged shooting positions but a few times I found it to still be too low to clear cover even when fully extended. Another competitor showed me his super-lightweight shooting sticks that folded up into a tiny pouch, and in the future I’ll probably try a set of those out.
Tell us a little bit about the load bearing gear and pack you wore for the match, why did you choose it?
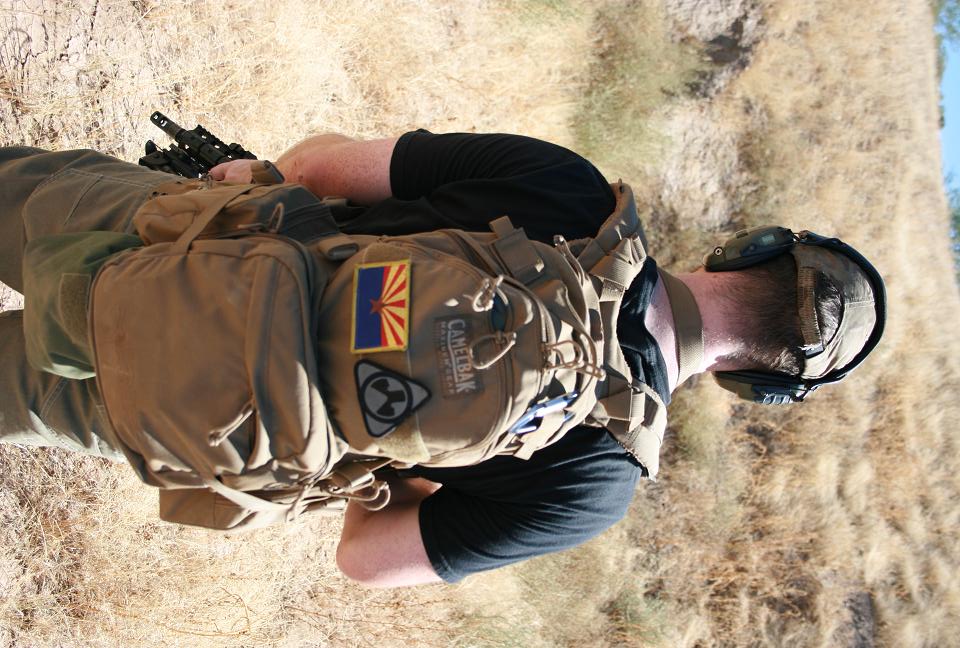
I tried to keep clutter off of my belt, and use a pack that allowed me to access the items I needed on the move without a lot of fumbling. I wore a Wilderness Instructor Belt, a Galco Triton IWB holster (with Glock 19), and a single pistol and AR mag pouch on my support side. I also had a Maxpedition RollyPoly pouch to store my earmuffs on the move. My pack was a Camelbak Linchpin which was much larger than necessary, but the outer pockets are sized for AR15 mags, and there is a generous “dump pouch” area that was perfect for stowing the bipod.
What would you do different for next time?
Probably find a smaller backpack with a similar layout, and swap the bipod for shooting sticks. I wouldn’t reduce my ammo load because you never know what might go wrong, and an extra pound of ammo can go a long way on a tough course. Other than that I felt like I chose my gear wisely this year.
For the athletes reading this, how should they get started if they want to do these kind of physical shooting events?
Start shooting local 3-gun and carbine matches, and incorporate physical activity into your shooting practice as much as possible. Simply doing a light jog, or a minute of jumping jacks or burpees can dramatically alter your shooting, and knowing how to compensate for that fatigue can be a huge advantage at any match.
For the shooters reading this, how should they get started if they want to participate in more physical competitions?
The same advice as above applies to shooters as well. Push yourself out of your comfort zone during training, and find your limitations. Start hiking, running, or biking during the week and you’ll be surprised how much it helps you in competition. No one ever regrets being in better shape, or wishes that they couldn’t run farther or faster. Physical fitness is a very inexpensive discipline to improve on versus shooting, so use that to your advantage.






You must be logged in to post a comment.