
In the spring of 2010 I had One Source Tactical’s Technical Services Division modify the slide on one of my Glock 34s to accomodate a Trijicon RMR. The turn around time was fast and the work well done. The OST-TSD modification is unique in that it allows iron sights to co-witness through the optic. The ability for the irons to co-witness is what made the system appealing to me. Training to use a dot on a pistol is much harder than on a long gun. On a long gun the stock naturally puts the shooters eye in the correct location to see the dot with cheek weld. On a pistol, if it is not presented correctly, there is no natural index point and the shooter can struggle to find the dot. The co-witnessed irons allow the shooter to more naturally pick up the dot on the draw when transitioning from traditional sighting systems. They’re also handy to have in case the battery/sight dies (something I haven’t had happen in 1 year of use).
Once I had the pistol back together, the trickier part was getting a holster to fit my needs. I’ve been using the 6000 series Safariland holsters since 2003 for 3 gun competition. I’ve always liked the added security of the rotohood and I don’t feel it has ever slowed my draw down. As there is no dedicated holster with retention on the market for the Glock with RMR, and I am used to the system I decided to modify one of the holsters I had already.
I assume a lot of other people are running 6000 series Safariland holsters and might want to see how to go about doing this.
You will need the following
Heat gun
epoxy
4″x4″ square of kydex
Gloves to work the hot kydex with
hack saw blade.
Step 1: Cut down on both sides of the front of the holster about 2″ with the hacksaw blade. Do not remove the piece left standing in the middle.
Step 2: Use the heat gun to warm up the kydex piece in the center and bend it out away from the holster.
Step 3: Insert your Glock and make sure it goes into the holster all the way and there is no interference with the sight. If it does have interference cut/bend further.
Step 4: Without the glock in place get the kydex piece heated back up. Then put the glock back in and form it around the RMR.
Step 5: Use hacksaw blade to cut the kydex piece off above the RMR body. Verify that the rotohood clears and fully opens.
Step 6: heat up up your kydex square and begin forming it around the holster to cover up the gaps. This will be a multi-step process of heating and fitting. Continually verify that the center piece is not deforming from heat transfer. You will need to cut off portions of the squared to make it fit appropriately
Step 7: Dry test everything for fit, make sure the piece is snug around the holster and does not interfere with rotohood.
Step 8: Epoxy the add on piece in place.
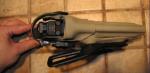
End Results:


You must be logged in to post a comment.